Eddy current measurement of thickness, electrical conductivity, and distance with the Conducsens™ Nondestructive Evaluation (NDE) system
Abstract: This article describes the Conducsens ™ non-destructive evaluation system, which uses eddy currents to measure the thickness, electrical conductivity, and distance of metal targets such as tubes, bottles, turbine blades, and tanks. The Conducsens system revolutionizes wall thickness measurement by allowing people to measure an object’s thickness without prior study or calibration. With the Conducsens system, measuring the thickness of a tube is as easy as measuring its length with a conventional ruler.
Author: LÊ Minh-Quang, Ph. D., Sciensoria sarl, 35170 Bruz France. Email: mq.le@sciensoria.fr, Web site: https://www.sciensoria.fr
Introduction to the Conducsens™ Nondestructive Evaluation (NDE) system:
In 2015, Sciensoria released a new eddy current-based nondestructive evaluation (NDE) system called the Conducsens™. This system can measure several parameters of a tested material, including thickness, distance, electrical conductivity, and magnetic permeability, without prior calibration. This significantly reduces the time and cost of calibration gauges. The Conducsens™ offers a cutting-edge solution for nondestructive testing and inspection, providing accurate and reliable results for a wide range of applications.
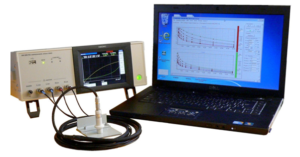
Fig. 1- The Conducsens™ NDE system
The eddy current technique in nondestructive testing/evaluation is well-known: a magnetic field creates induced currents inside a conductive material, called eddy current. These current flows depend on the material properties like geometry (thickness, distance), and physical parameters like electrical conductivity and magnetic permeability. Flaws like voids or cracks also disturb eddy current flows. Consequently, the secondary magnetic field created by the eddy current reflects the internal state of the tested material. By measuring the probe impedance, one can indirectly determine this magnetic field and can extract information about material health, physical properties, and geometrical parameters, for example.
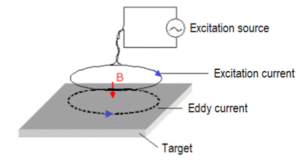
Fig. 2 – Illustration of the eddy current phenomenon
Thickness is one of most important geometrical properties of an inspected object. For example, the wall thickness of a tank or a tube under a corrosive environment is regularly inspected in order to determine if a leak or explosion is imminent. There are also many examples regarding thickness measurement of thin sheets in metallurgy, aluminum stamping, additive manufacturing, hologram printing, etc. Another example is tube bending: the thickness of the tube wall is measured at several points on its circumference and bending angle is adjusted as a function of the measured thickness values.
Traditionally, the eddy current technique is sensitive to many parameters at a time: distance, thickness, conductivity, permeability, etc. This is a strong and also a weak point, because when more than one of the parameters vary, it is very difficult to interpret the signal changes. Calibration is only possible for a small number of influencing parameters, because the total number of the calibration gauges necessary for the operation is M= NP. N is the number of calibration points for each influencing parameter, and P is the number of the influencing parameters. It is easy to see that if P increases, M increases very quickly and tends to the so-called “numerical explosion”. As manufacturing calibration gauges requires time and has to be done carefully, it is often impossible to make a great quantity of samples.
Operation principle of the Conducsens™ NDE system
The Conducsens™ has a decisive advantage: it is based on a proven large physical model which takes into account the influence of the considered parameters: thickness, distance, curvature, conductivity, permeability. Using the model, one can predict the influence of each parameter, thus avoiding the use of calibration gauges. The model can also be inverted to compute the parameters using the measured signals.
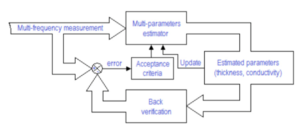
Fig. 3 – Synoptic of an inversion process using a physical model
Measuring thickness of thin metallic sheets
An example of application is the measurement of a thin sheet made of a magnetic material: Nickel. Because the sheet is very thin, it is impractical to measure it with a contact micrometer. Also because it is wide, it is impossible to measure it in its center with the micrometer. Ultrasound thickness gauges also fail, because the thickness is too small, and the echo returns too quickly to be measured.
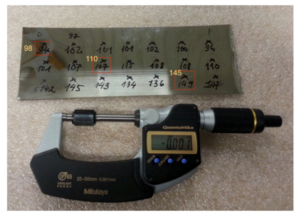
Fig. 4 – Measuring thickness using a Mitutoyo micrometer
The Conducsens™ NDE system uses a single probe to measure the thickness from only one side of the sheet . Therefore, it allows us to measure the thickness on the entire surface of the sheet. The measurement procedure is as follows. First, the magnetic permeability and electrical conductivity are determined by making measurements on a point where the thickness is already determined carefully using a high-grade micrometer. Using the measured values, Conducsens™ is then used to measure the unknown thickness values on other points on the sheet. Each time, it determines the thickness and also the lift-off, because lift-off varies from one point to another and needs to be determined systematically.
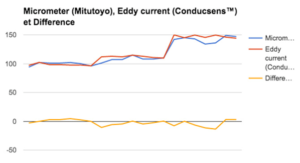
Fig. 5 – Comparison between measurement results given by a high-grade Mitutoyo micrometer (blue curve), the eddy current Conducsens™ NDE system (red curve). The difference is represented by the yellow curve.
For this application, Conducsens™ can show its practicality. The eddy current thickness measurement with Conducsens™ is very quick: only several minutes to get dozens of points, while a contact micrometer requires hours.
Measuring thickness of tube wall
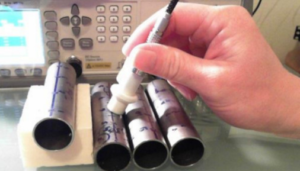
Fig. 6 – Measuring thickness on the circumference of tubes made of different metals (titanium, aluminum and stainless steels)
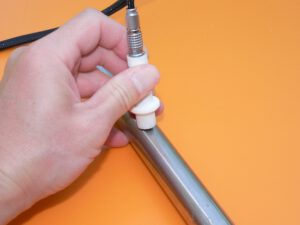
In another application, Conducsens™ is used to measure the thickness of a tube at several points on its circumference. The tube can be made of different metals like aluminum, stainless steel, or titanium, so their conductivities are not same. Compared to the ultrasound method, the eddy current method does not require liquid coupling and precise positioning, thus saving time. So, there are 3 unknown parameters to be determined for each measurement: not only the thickness, which is what we need to measure, but also the lift-off and the material conductivity. The Conducsens™ system performs these measurements very effectively, as shown in the following picture, where eddy current measurement results and ultrasound measurement results are presented together for comparative purposes. As the eddy current method is easier to apply and faster, it is preferred in an industrial environment.
The absolute eddy current results are obtained from thickness prediction by the computer without any calibration (blind measurement), while the calibrated eddy current results are obtained by shifting the absolute eddy current results curve to a known thickness value (in this case, the 1st value of the ultrasound curve). In comparison, the ultrasound method is always calibrated during the measurement setup stage. As we can see, the calibrated eddy current and the ultrasound methods give nearly the same results.
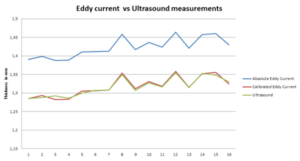
Fig. 7 – Comparison between measurement results given by the ultrasound method (green) and the eddy current method (red and blue).
The Conducsens™ is also practical for application in dangerous environments like nuclear or chemical facilities. In these environments, measurements should be done as quickly and cleanly as possible. That is why eddy current is preferable to ultrasound: no coupling, easier to install, faster, etc.
Other applications of the Conducsens(™) NDE system
- Measurement of electrical conductivity of poorly conductive materials like graphite or carbon composite (CFRP)
- Measurement of thickness and electrical conductivity of additive manufactured parts (with curved surface)
- Real-time monitoring of corrosion on aluminum parts
- In 2019, German automotive supplier Mahle used 2 Conducsens ™ to check over a million parts for 6 months. Sciensoria is proud to provide this tool to such a large company. See this article.
Conclusion
The Conducsens™ NDE system designed by Sciensoria is based on a modern computerized approach and can get rid of the traditional constraint of multi-parameter influence. It opens new perspectives in the measurement of thickness in many complex applications, where it can be an ideal complement to the ultrasound method.
Contact me at mq.le@sciensoria.fr and visit www.sciensoria.fr to learn more.
See also: Conducsens 2018™ User’s Manual (pdf)
LÊ Minh-Quang, Ph.D, technical manager, Sciensoria
